After I got the chat and game output to work on my SteelSeries Arctis 5 on Ubuntu, I tried sending a patch to the PulseAudio maintainers to include it in the distribution by default.
PulseAudio maintainer Tanu Kaskinen pointed out to me that I had to use two separate (custom) output paths. Fixing this caused the outputs to be selected more easily in sound configuration dashboards. For example in the gnome sound configuration screen:
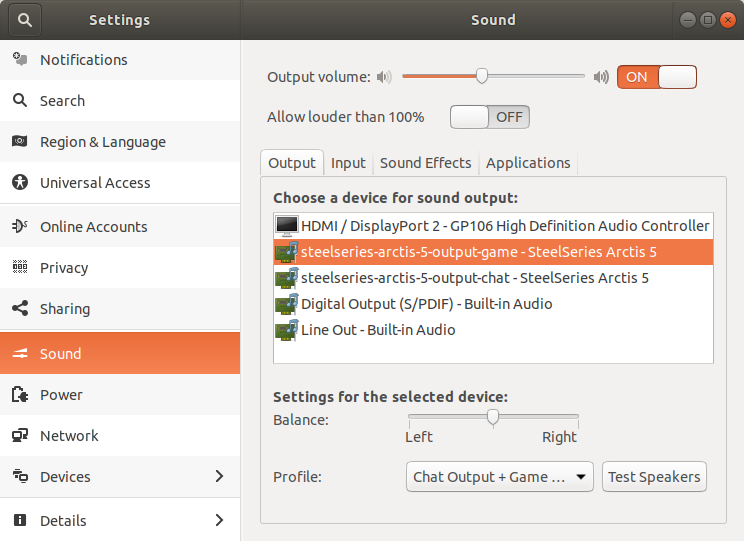
The names steelseries-arctis-5-output-* aren't pretty, but to change that, pulseaudio would need to be recompiled.
I played around with the profile configuration and configured which elements belong to which output. The game output is linked to the PCM element and the chat output is linked to the Com Speaker element. After configuring this correctly I noticed that the chat output volume slider now goes a lot louder than before and they don't interfere with each other.
Some welcome improvements! I've immediately released an updated version of my distributed version:
Download the updated version for debian, ubuntu and linux mint:
A while ago, I bought a new gaming headset, the SteelSeries Arctis 5. One of the main reasons I got is, was the "ChatMix Dial", a physical knob which can mix two audio outputs. Turning it to the left gives you more game sound, turning it to the right gives you more voice chat sound.

This works fine on Windows. It recogizes the two audio outputs and you can mix between them. On Ubuntu however, it doesn't. The only output it enables is the voice chat output and the microphone work. The game output stays hidden.
A simple solution
I took some time trying to figure out how to fix this and found out that ALSA recognizes the game output, but pulseaudio does not.
Yesterday I found an article about the Arctis 7 headset on Ubuntu by Johan Heikkilä and decided to try out the solutions he'd come up with. His first solution was using this command:
pacmd load-module module-alsa-sink device=hw:1,1
I've had to change the device address to hw:2,1 for mine to work and this added an extra audio device in my sound settings screen that enabled the game audio output.
The main problem with this approach is that once you reboot or unplug and plug in the device, it no longer comes up and you need to enter the command again for it to show up again.
A better (more sophisticated) solution
The second solution Johan added involved adding a pulseaudio profile file, a udev rule and some configuration to go with it. After putting all these files in place, I needed to change the product id in the udev rule from 1260 to 1250 so it matches the Arctis 5 and enables the profile:
ATTRS{idVendor}=="1038", ATTRS{idProduct}=="1250", ENV{PULSE_PROFILE_SET}="steelseries-arctis-usb-audio.conf"
This did something! The game output was now enabled and the sound overall was a bit louder. However, the voice chat output and microphone input now were no longer working.
After that I figured out that the profile expects a mono output for the voice chat, but the Arctis 5 seems to have stereo. After changing that, everything worked.
The result
I've cleaned up the configuration and pushed it to a repository on github, along with a deb file for easy installation on Debian, Ubuntu, Linux Mint, etc.
The repository can be found here:
Download the deb:
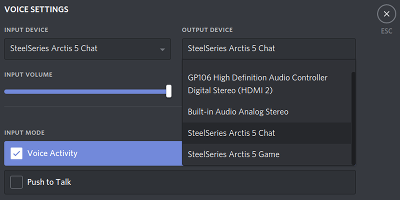
After installing, and reconnecting the headset, it should enable the game output by default. In apps like Discord, the voice chat output should also be available to be selected as output:
I've been using a combination of Vagrant, Virtualbox and Ansible for a while now when developing my Symfony (and other PHP) applications and it has worked out just fine. Ever since I heard about Docker a few years ago, it seemed like a good idea, but a bit of a pain to set up and manage. But when my colleague Jordy showed me Docker Compose last week, which seemed a lot simpler and faster than my current flow, I was eager to try that out.
Docker vs Vagrant
At work our projects are quite complex and require a lot of different services like RabbitMQ, Couchbase and Elasticsearch, but my personal project are much more traditional, requiring only a webserver, PHP and MySQL. Fact of the matter is that I could reuse the same Vagrant/Ansible configuration for all my projects, and it would work just fine.
However, there are a few problems with that. Every vagrant box I spawn needs a whole operating system to run, a disk image containing said OS and the CPU and RAM resources to run it. When I use Docker, I can use the same image per service (eg. MySQL or nginx) and they would only use that diskspace once. It also doesn't need a whole operating system to run, since it runs isolated on my already running Linux kernel.
Aside from that, starting up a few Docker containers is much quicker than booting a whole virtual machine with a lot of services (and some stuff I don't really need.)
My Docker Compose setup
In the root of my project I added a docker-compose.yml file which contains something like this. (I stripped it down a bit and made it more generic...)
# docker-compose.yml
version: '3'

services:
    mysql:
        image: mysql:5.7
        ports:
            - 3306:3306
        volumes:
            - myproject_mysql:/var/lib/mysql
        environment:
            MYSQL_ROOT_PASSWORD: rootpassword
            MYSQL_DATABASE: myproject
            MYSQL_USER: myproject
            MYSQL_PASSWORD: myproject

    nginx:
        image: nginx:1.12-alpine
        ports:
            - 8080:80
        volumes:
            - ./docker/nginx/vhost.conf:/etc/nginx/conf.d/default.conf:ro
            - ./:/code
        links:
            - php

    php:
        build: docker/php
        volumes:
            - ./:/code

volumes:
    myproject_mysql:
        driver: local
I defined a volume called myproject_mysql and mounted it in the mysql service on /var/lib/mysql. This is the path where MySQL stores all its data. By mounting the volume, we persist the data outside of the Docker container. This makes sure the data is saved when the container is shut down and started up again.
The mysql and nginx services are quite straight forward and use images directly from the Docker Hub with some custom configuration. You can tell because it uses the image: directive.
I also mounted the ./docker/nginx/vhost.conf file into the nginx container. I used the nginx vhost file provided in the Symfony documentation and changed server_name to _ and root to /code/web.
The php service is different, because it needs to be built. The build: directive tells Docker Compose where it can find the Dockerfile containing the steps to build the container. In this case it is in docker/php/Dockerfile, relative to the docker-compose.yml file.
It might contain the following:
# docker/php/Dockerfile

FROM php:7-fpm

RUN apt-get update && apt-get install -y \
    git \
    zlib1g-dev \
    libicu-dev \
    libxml2-dev \
    libaio1 \
    vim \
    unzip

RUN docker-php-ext-install \
    pdo \
    pdo_mysql \
    opcache \
    intl \
    xml

RUN docker-php-ext-enable \
    pdo \
    pdo_mysql \
    intl \
    xml


RUN usermod -u 1000 www-data


WORKDIR /code
The FROM directive tells on which Docker image it should be based. These images are also the ones you can find in the Docker Hub. The RUN directives run a command inside the container. As you probably can tell, the RUN commands I defined install and enable some PHP extensions.
The RUN usermod -u 1000 www-data is a bit a hack, by the way. Symfony writes cache and logs to the var directory and to prevent permission problems, we'll just give the www-data user in the container the same uid as the user I'm using on my PC. You should note that if your uid is not 1000, this will not work for you and you'll need to change it accordingly.
WORKDIR finally set the default working directory.
Running the containers
Once the docker-compose.yml, the docker/php/Dockerfile and docker/nginx/vhost.conf files are in place, we can start up the containers.
You can use the following command to start all containers in foreground mode:
docker-compose up
In foreground mode, the logs for all containers will be shown as if you were using tail -f. If you press CTRL-C, the containers will shut down. What I prefer to do is run the containers in detached mode:
docker-composer up -d
This will start the containers and return to your shell after that. If you want to see the latest logs, you can run:
docker-compose logs
Or you could follow (tail -f) the logs by adding -f.
Shut everything down using:
docker-compose down
By adding -v, you'll also delete the volumes you've defined.
Accessing the webserver, php or mysql
Now you've got your containers running, you might want to access the webserver to check if your project still runs correctly. Since we've added some port mappings in the docker-compose.yml file, you'll easily be able to.
On the nginx we've mapped port 8080 to 80. This means you can access http://localhost:8080 and it maps to port 80 inside the nginx container.
We did the same on the mysql container, mapping localhost:3306 or mysql://localhost to port 3306 inside the container. That will allow you to access your mysql server using something like DBeaver or MySQL Workbench.
You may also run your Symfony console commands from inside the php container. You can do this using this command:
docker-compose exec --user www-data php bin/console <arguments>
The --user www-data argument ensures you don't get the permission issues I described earlier.
Conclusion
This is all a whole lot faster than what I was used to when running Vagrant boxes. I also found it quite easy to set up. Switching between versions of services has also been made much easier since we no longer depend on a base operating system anymore.
The only problem I was stuck on quite a while was the permissions problem, but settings the uid of the www-data user to my local hosts user id and using --user www-data when running php commands from inside the php box seems to be a nice and simple solution.
A few years back I bought an Opel Astra H from 2008 and it has the CD30 MP3 audio system. Which means that it will play MP3s burned on a CD. So one of the first things I tried was burning a few albums on a CD and play it in my car. There were some problems. Some of the files wouldn't play correctly and some other wouldn't play at all. Most files would play, but showed a garbled mess where the track name should be.
I naturally tried figuring out how I could make all MP3s (and meta data) work... using linux and a few command line tools!

As it turned out, it only supports MP3s encoded with a constant bit rate (CBR) and ID3v1 tags for the meta data. Most MP3s I download are in variable bit rate (VBR) and have ID3v2 tags with propably some album art in it or something.
Fixing the audio
I first tried converting the files to a 192kbps CBR format using avconv:
$ avconv -i filename-in.mp3 -codec:a libmp3lame -b:a 192k -vn filename-out.mp3
This made sure that the audio would always play correctly, but the meta data would still not be shown correctly. I knew I needed to convert it to ID3v1 and strip off all the rest.
Stripping off the rest
I found another tool which can manipulate and strip off id3-tags and other meta data from MP3s: eyeD3. You can delete anything you don't need on your car stereo using the following commands:
$ eyeD3 --remove-comments --remove-lyrics --remove-images filename-out.mp3
$ eyeD3 --to-v1.1 filename-out.mp3
$ eyeD3 --remove-v2 filename-out.mp3
This also fixed the meta data problem.
Speeding it up
When I finally had all of this working, I had it set up so that I could drop some files in a folder, run a script and receive the converted files in another folder. The script only processed the files sequentially. I noticed that only one of my CPU cores was occupied when converting the files, so I knew that this could be sped up by making use of all cores.
I found another cool little tool called GNU Parallel which very simply enabled this for me:
$ find "in" -type f | parallel ./convert-one.sh "{}"
Now it runs about four times faster since I have four logical CPU cores in my PC.
Find the scripts on GitHub
I've put the final scripts on GitHub. Just throw some albums or random MP3 files in the in directory, run ./convert-all.sh and, once the script is done, they'll be converted and ready in the out directory.
About a year ago we were about to create our new company website. My colleague Jeroen, who is on front-end development, was assigned with this task. Jeroen also wanted to learn more about the Twig template engine at that time.
I figured I could kill two birds with one stone by quickly creating a framework which made it very easy for Jeroen to create the website using Twig. Easy Twig is what I've come up with. It allows you to very quickly build static websites in the same way you would when using plain HTML, but with the advantage of Twig. That means that you can make use of template inheritance, includes, macros, and more!
Check the project out on Github. Also check out my companies shiny website, which is built using Easy Twig!